How to Use Gen 2 Reticles
The Gen II series of mil based reticles effectively serve a multitude of functions and for a wide variety of purposes from hunting to combat. Gen II series reticles are also placed in the first focal plane to further enhance their utility for the end user. Currently there are two reticles in the Gen II series, the standard Gen II Mil Dot and the Gen II XR reticle.
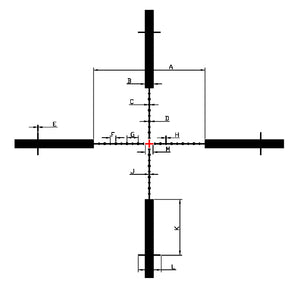
Gen II Mil Dot:
The Gen II Mildot™ is a mil-based reticle with hash marks in between the mildots and every five mil on the outer posts that can be used for a variety of practical applications. The Gen II Mil Dot is combat proven and is currently installed in the USMC’s M8541 Scout Sniper Day Scope.

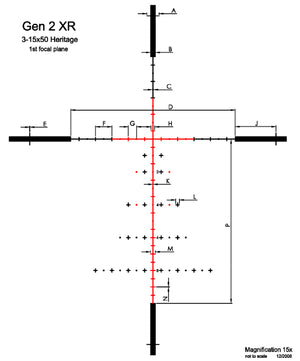
Gen II XR Reticle:
The Gen II XR reticle is a variation of the tried and true Gen II Mil Dot that uses additional hold over points below zero to better facilitate range estimation and trajectory compensation. The reticle is also thinner than the standard Gen II Mil Dot to obscure less of the target and allow for better shot placement.
Using the reticle to range an unknown distance target:
The Gen 2 mildot reticle can be used in many ways but like many things it requires practice to become truly proficient at using it. Nothing can be truer when using the reticle to range the distance to a target, an application the reticle is often used for. To accomplish this task the size of the object must be known first, as this will greatly aid in getting an accurate range estimate. Below we will go through how to range a target that is 40” tall and 19” wide.
Step 1. Obtain a STEADY position and align the reticle with an edge of the target. There are several methods for doing this, but two of the most common are to place the crosshair at a corner or at the base of the target or use the thick post at the base of the target.
Step 2. Measure the height of the target in mils. Try to get the measurement down to at least 1/10th of a mil.
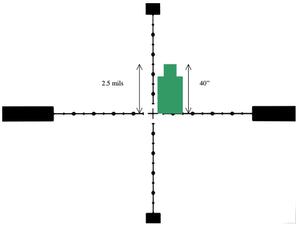
Step 3. Use this reading to plug into the distance formula to figure out the range to the target.
Distance Formula: Target Size in Inches X 27.77 ÷ Mil reading = range in yards.
Note: If ranging a target and the distance needs to be in meters, replace 27.77 in the formula with 25.4.
Using the above target: 40” X 27.77 = 1110.8 ÷ 2.5 = 444 yards
Step 4. If having just measured the height of the target, measure the width next.
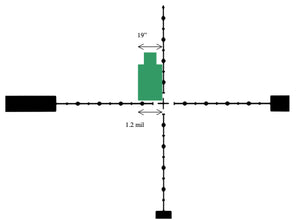
Step 5. Plug the measurement taken into the formula used in Step 3.
Distance Formula: 19” X 27.77 = 527.63 ÷ 1.2 = 439 yards
Step 6. Average the two figures together to get an accurate estimate of the range to the target.
444 yards + 439 yards = 883 ÷ 2 = 441.5 yards is the range to the target.
If the weather is hot and/or humid outside then it could be difficult to accurately range the target due to mirage obscuring the edges. Also if the target is facing the shooter at an angle then some measurements could be skewed by the angle. If the target is facing away from the shooter then mil only the height as an accurate width measurement can’t be made. Also if the target is facing up or down to the shooter, measure the width, as an accurate height measurement can’t be made.
Using the reticle to compensate for bullet trajectory
MOA to Mils Conversion Formula:
MOA ÷ 3.438 = Mils
Example: 1.8 MOA ÷ 3.438 = .5 Mils
After getting or converting all of the necessary data in Mils, apply it to the reticle.


Using this method the shooter does not have to adjust the elevation knob to engage targets all the way out 500 yards.
Another method that can be used to compensate for the bullet trajectory is to dial the elevation knob for a mid-range distance such as 400 or 500 yards. Then use the reticle to engage targets that may be nearer or farther than the mid-range distance dialed into the scope. Like the above method it helps to have all of the data in Mils already.

This method is excellent for engaging multiple targets at different distances if there is limited time to dial elevation knobs up and down.
Wind Compensation

The Gen 2 is can also be used to compensate for the effect wind has on the bullet as well as for moving targets. The method of obtaining the wind hold-off values is the same as getting the elevation values it’s just that they’ll be on the horizontal axis instead of the vertical.
In this example, the target is at approximately 400 yards with an 8-10 mph full value wind coming from left to right. The shooter has the elevation dialed in and simply has to look at the data chart for the round to determine the amount of wind hold off. If the click values and data are in mrad this is very simple, if it’s in MOA a conversion must be made. In this case about .9 mil of hold off is required for the distance and wind speed to get a hit in the center mass of the target.
Using this method of hold off for wind also allows the shooter to quickly compensate for shifting winds while still maintaining good accuracy. The principles are the same as above when using the reticle with moving targets.
How to use the reticle to speed the zeroing process
If the scope’s adjustments are in milliradian then zeroing the rifle can be a simple, one shot process since the reticle can be used to effectively “measure” the correction needed. For scopes that adjust in MOA, measuring the correction necessary to bring rounds to the point of aim requires an extra process to convert what is seen through the scope into MOA data that can be dialed in. For scopes with click values in 0.1 milliradian however, the process is as simple as looking through the scope as what is seen against the reticle is the correction that has to be made.
Example: You observe the bullet’s impact on the target .6 mils right and .3 mils high of the point of aim.
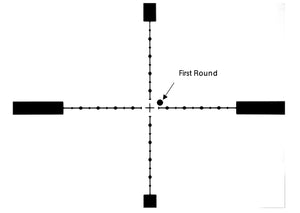
In a scope with adjustments with milliradian the adjustment to dial in get zeroed would simply be .3 mil down, .6 mil left. In a scope with MOA adjustments the following conversion would have to be made:
.6 Mil X 3.438 = 2 MOA Down
.3 Mil x 3.438 = 1 MOA Left
As you can see the mil-based reticle and the Gen II series reticles in particular are very versatile and can accomplish a multitude of tasks effectively from hunting to combat operations.
To obtain milliradian based data charts you can look up the JBM Ballistics program on the web. It is a free ballistic program service that is easy to use and plenty accurate if the data is inputted correctly.


